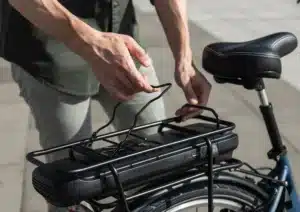


Rivets are essential fastening tools in many projects, from car manufacturing to furniture assembly. Whether you're a professional or a DIY enthusiast, knowing how to use a rivet correctly can mean the difference between a job well done and a mediocre one.
In this comprehensive guide, we'll show you how to rivet effectively to securely fasten two objects together. We'll cover everything from the tools you need to the detailed steps involved in the riveting process. So, let's begin our journey into the fascinating world of rivets
What is a Rivet Pop?
A pop rivet is a type of rivet that has been designed to offer a fastening solution solid and sustainable. It's particularly useful when you need to attach two objects together permanently, such as a license plate, a car top, or even the fuselage of an airplane.
The operation of a pop rivet is quite simple, but ingenious. When tightened, the rivet deforms and forms a ball on the other side of the part to be fastened. This creates a solid attachment that holds the two objects together securely.
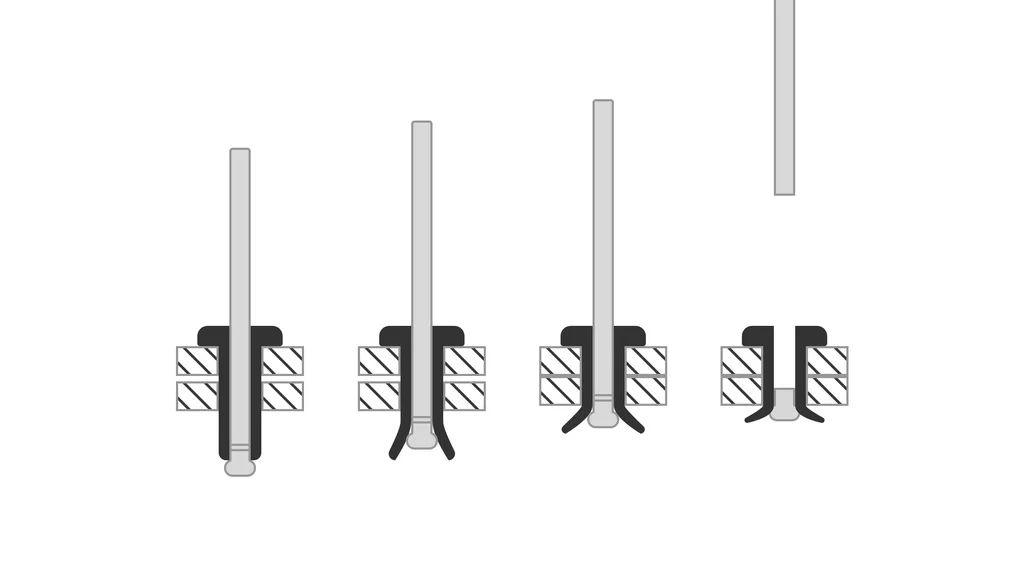
One of the key features of pop rivets is that they can only be removed by piercing the rivet.
This means that, once set, a pop rivet provides an extremely secure fastening that cannot easily be dismantled. This is why pop rivets are often used in situations where a permanent fastening is required."
Tools needed for riveting
Effective riveting requires a specific set of tools. Here's what you'll need:
- Riveting pliers: This is the main tool used to install rivets. It is designed to grip the rivet and squeeze it until it locks into place.
- Rivets: There are different types of rivet, each suited to specific materials and applications. Make sure you choose the right type of rivet for your project.
- A drill : You'll need a drill to create the holes into which the rivets will be inserted. Make sure you choose the right size drill bit for your rivets.
- Drill bit: The drill bit must be suitable for the materials you are fixing and must match the size of your rivets.
Having the right tools at hand before you start your riveting project will help you work more efficiently and achieve a more precise, professional result.
Detailed Riveting Steps

Riveting may seem a complex task, but with the right tools and a clear understanding of the process, it's actually quite simple. Here are the detailed steps for riveting:
- Preparing the part to be riveted : Start by preparing the part you're going to rivet. Place it on a solid, stable surface. Make sure it's secure and won't move during the riveting process.
- Hole drilling : Use a drill with the appropriate size bit to drill holes in the parts you are going to rivet. Be sure to drill the holes with precision and alignment.
- Rivet insertion : Insert the rivet into the hole you've drilled. The rounded end of the rivet should be inserted first, and the rivet stem should protrude from the other side of the workpiece.
- Preparing the riveting tool : Place the rivet in the head of the riveting tool. Ensure that the pliers are set to the correct size for the rivet and that the pliers' jaws grip the rivet firmly.
- Rivet tightening : Hold the riveting tool firmly and apply steady, firm pressure to tighten the rivet. Continue tightening until the rivet stem breaks, indicating that the rivet is securely in place.
How to Remove a Rivet
Occasionally, you may need to remove a rivet, either because it has been incorrectly installed or because you need to dismantle the attached part. Here's how to proceed:
- Drill the rivet: Use a drill with a bit the size of the rivet. Drill slowly through the center of the rivet until the head comes off.
- Remove the rest of the rivet: If part of the rivet remains in the hole, use a pin driver or small screwdriver to push it out. If the rivet is stubborn, you can use pliers to grip and pull it out.
- Clean the hole: Once the rivet has been removed, clean the hole to remove any metal residue.
Removing a rivet requires patience and precision, but with the right tools and technique, it's a task you can accomplish successfully.
Conclusion on the use of rivets
Riveting may seem intimidating at first, but with the right tools and a good understanding of the process, it's a skill you can master. Take your time, be precise in your work, and don't forget to check your work once you've finished. With practice, you'll find that riveting is a valuable skill that can help you with many DIY or repair projects."
Video Tutorial
For those who prefer a visual learning experience, we'll include a detailed tutorial video showing all the steps involved in setting a Pop rivet. This video will allow you to follow the riveting process in real time, which can be particularly useful if you're new to riveting.
Thank you
This article was brought to you by ByCommute.
ByCommuteexpert in professional bicycle shelters, offers eco-responsible solutions made in France.